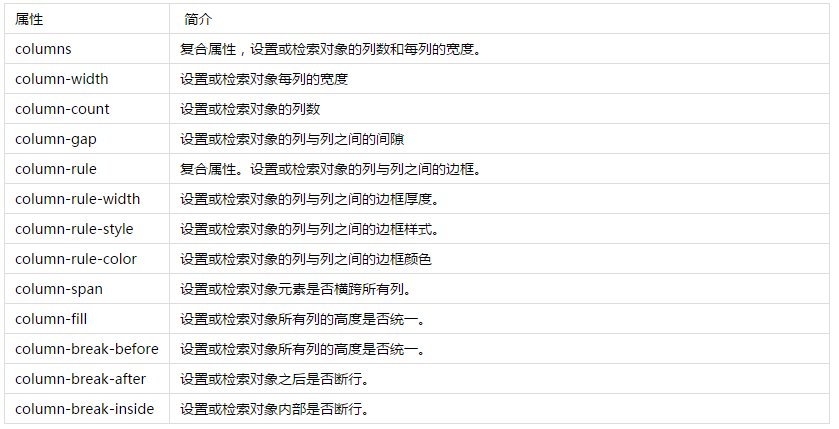
基于CSS3实现瀑布流,使用CSS3的CSS 多栏(Multi-column)。
瀑布流,又称瀑布流式布局。是比较流行的一种网站页面布局,视觉表现为参差不齐的多栏布局,随着页面滚动条向下滚动,这种布局还会不断加载数据块并附加至当前尾部。我们只是实现了多栏的布局。
CSS 多栏(Multi-column) :
Markup
<html>
  <head>
    <link rel="stylesheet" type="text/css" href="css/main.css">
    <script type="text/javascript" src="../lib/jquery/jquery-1.11.1.min.js">
    </script>
  </head>
  <body>
    <div id="main">
      <div class="box">
        <div class="pic">
          <img src="">
        </div>
      </div>
      <div class="box">
        <div class="pic">
          <img src="">
        </div>
      </div>
      <!-- 这里省略多个class为box的div-->
      <div class="box">
        <div class="pic">
          <img src="">
        </div>
      </div>
    </div>
  </body>
  <script type="text/javascript">
    var width = 300,
    height = 300;
    $('.box img').each(function() {
      // 随机图片的高宽,如果大小一样,就没必要用瀑布流了
      width = Math.floor(Math.random() * 100) + 300;
      height = Math.floor(Math.random() * 500) + 300;
      $(this).attr('src', 'http://placekitten.com/' + height + '/' + width);
    });
  </script>
</html>CSS
* {
	padding:0;
	margin:0;
}
#main {
	-webkit-column-count:4;
	-moz-column-count:4;
	column-count:4;
	-moz-column-gap:20px;
	-webkit-column-gap:20px;
	column-gap:20px;
	padding:10px;
}
.box {
	padding:15px;
	border:solid 2px #eeeeee;
	border-radius:4px;
	margin-bottom:15px;
	cursor:pointer;
}
.box img {
	width:100%;
}其中的 column-count 代表分成几列,column-gap 代表列和列之间的宽度,你可以根据自己的需要调整。我们还可以使用 column-width 来定义列宽。
这样就完成了,是不是很简单。

